A custom vinyl pressing is a manufacturing job, not a print job, and the order in which you make the decisions matters as much as the decisions themselves. Lock the runtime before you argue about jacket colors, prepare the audio before you request a lacquer cut, and approve a physical test pressing before you commit to a full run. Get that sequence right and a pressing is straightforward; get it out of order and you end up re-cutting a side or reprinting a jacket. This walkthrough covers what to specify at each step, with the numbers a plant will expect you to have thought about.
Start with runtime, because it sets the format and speed
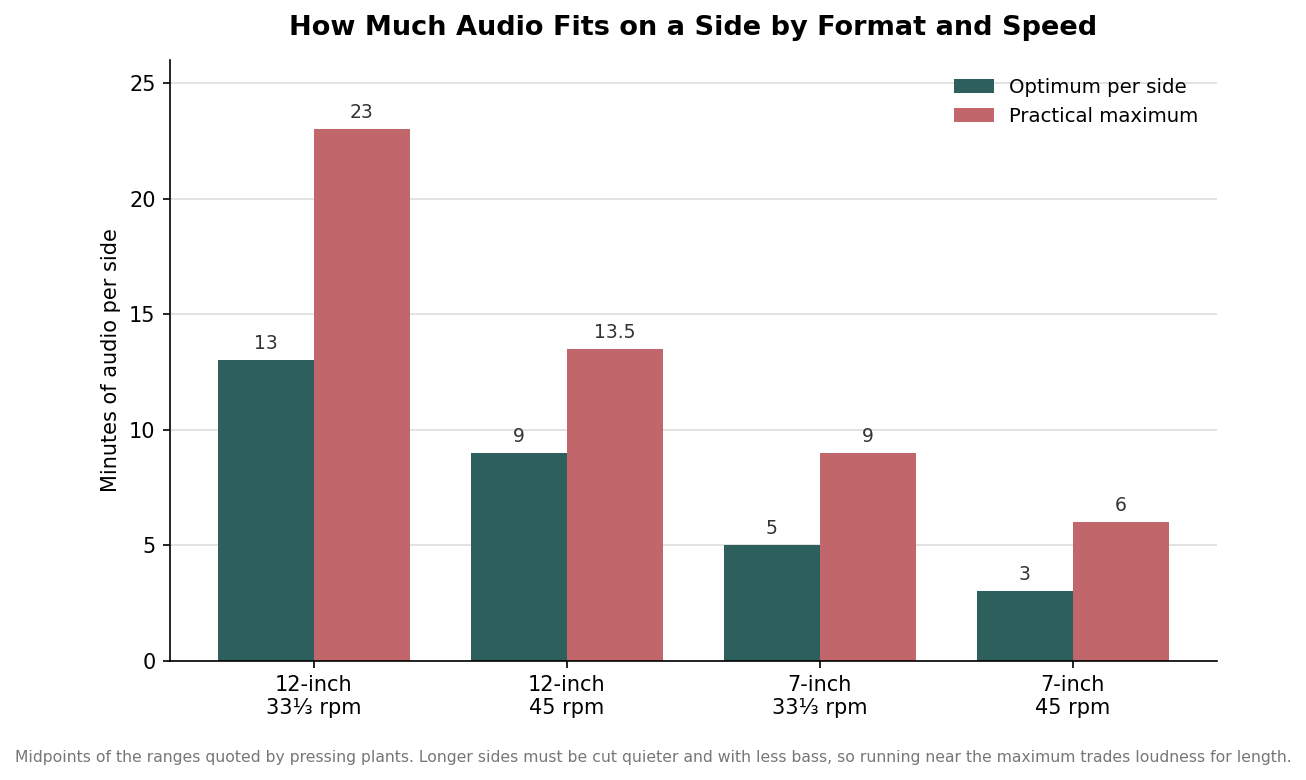
The single most important spec is how many minutes of audio you need to fit on each side, because that dictates the disc size and the playback speed, which in turn cap how loud and how bass-heavy the cut can be. A 12-inch record at 33⅓ rpm sits comfortably around twelve to fourteen minutes a side and can be pushed to roughly twenty-two to twenty-four minutes if you accept a quieter cut. Move the same record to 45 rpm for better fidelity and the comfortable budget drops to about nine minutes a side. A 7-inch is far tighter, holding around three to five optimum minutes depending on speed. Plants also like the two sides kept within about a minute of each other for consistent volume, so plan the track split, not just the total length.
The trade-off underneath these numbers is physical: the closer the groove spirals toward the center label, the shorter the wavelength it can hold, so a longer side has to be cut with less level and less low end. If your album runs long, the honest options are to spread it across more sides, drop to 33 rpm, or accept a slightly quieter master, not to pretend twenty-six minutes will sound as punchy as twelve.
Prepare the master before you ask for a lacquer cut
Vinyl rewards a master made with the format in mind. Supply the highest-quality files you have, ideally 24-bit; a plant will typically ask for at least 24-bit depth, and bit depth tends to matter more than an extremely high sample rate. Leave headroom by keeping peaks somewhere around minus three to minus six dB rather than a brick-walled digital master, because the cutting engineer needs room to work and an over-compressed file translates poorly to a groove. Manage the low end deliberately: center bass frequencies below roughly 100 Hz to mono, keep everything under about 300 Hz in phase, and roll off content below about 40 Hz that can make the stylus skip. De-ess the vocals in the 6 to 12 kHz region during the mix so sibilance does not distort on playback.
Sequencing is a technical choice as well as an artistic one. Because high-frequency detail degrades as the groove approaches the label, place your most dynamic, highest-energy tracks near the start of each side and let quieter material live toward the center. Finally, budget for a dedicated vinyl master and lacquer cut rather than sending a streaming master straight to the lathe; it is the step that most reliably separates a pressing that sounds like the record from one that sounds like a compromise.
Choose the format and the vinyl weight
Standard options are 7-inch, 10-inch, and 12-inch discs, each available at 33⅓ or 45 rpm. Weight is where buyers often overspend. A 7-inch runs around 40 grams and a 10-inch around 100 grams, while a 12-inch comes in a 140-gram standard or a 180-gram heavyweight. It is worth being clear-eyed about what the extra grams buy: on most turntables and for most recordings, a 140-gram and a 180-gram pressing should sound essentially identical. Heavier vinyl can slightly reduce micro-movements during playback, an effect that is most noticeable on higher-end systems, and it undeniably feels more substantial in the hand, which is why 180-gram is common on premium and audiophile releases. Choose it for the perceived quality and the feel, not on the assumption that it is automatically better sounding.
Color, jackets, and inserts add real cost per unit
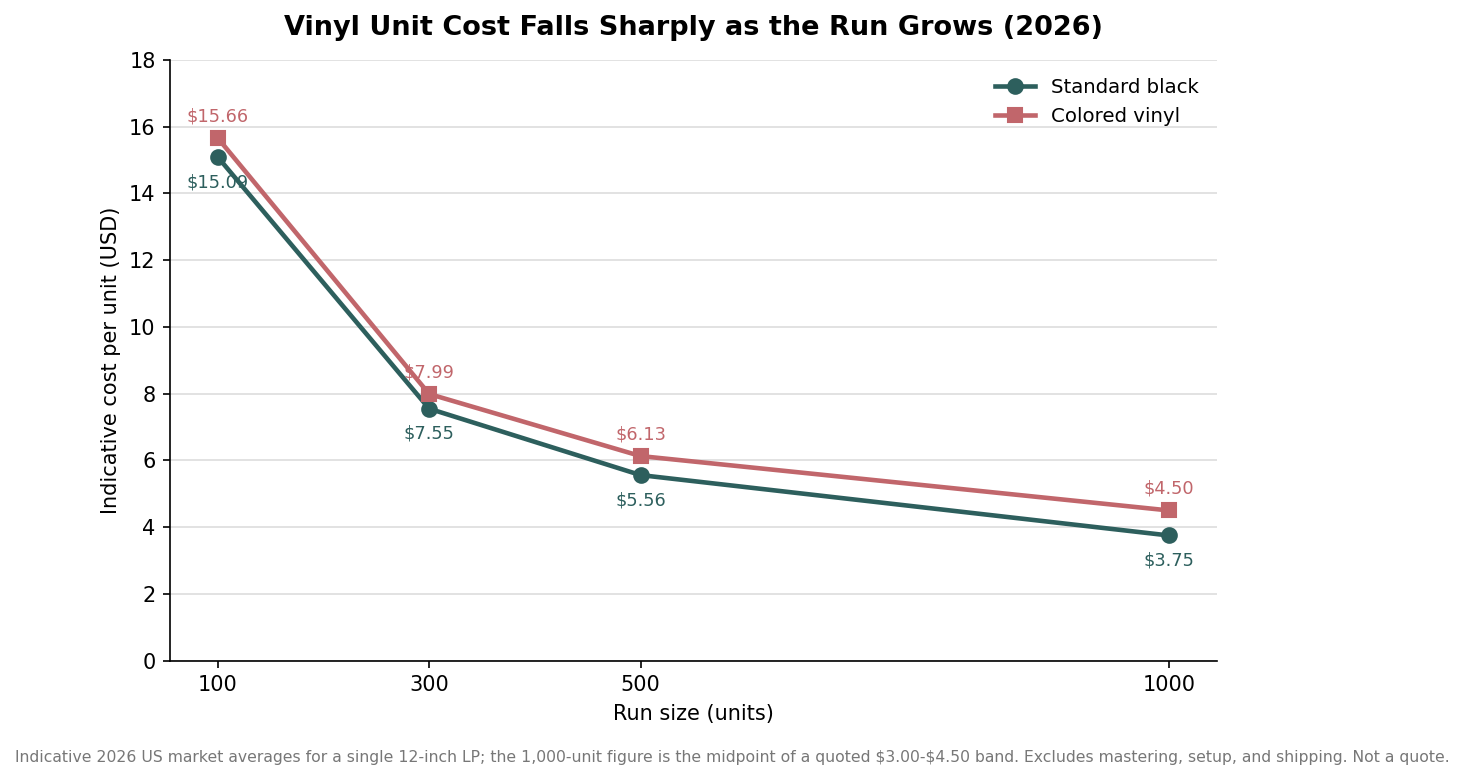
The finishing choices are where the budget moves fastest, so it helps to see them as per-unit adders rather than flat fees. As a rough 2026 guide, colored vinyl tends to add somewhere between fifty cents and a dollar-fifty per record over standard black, a two-color split runs a little above that, a gatefold jacket adds roughly a dollar-fifty to three dollars, and a printed inner sleeve adds around forty to eighty cents. None of these is large on its own, but stacked together on a small run they can move your unit cost meaningfully. The base unit cost itself is dominated by quantity, as the curve below shows: pressing is a high-setup process, so the per-record price falls steeply from a hundred units up to a thousand.
Approve a test pressing, then plan the calendar and quantity
Before the full run, the plant sends test pressings, usually cut on black vinyl regardless of your final color, and this is the moment to check sound quality, track spacing, sequencing, and any surface noise. Treat approval as a gate, not a formality: fixing a problem now costs a re-cut, while catching it after the run costs the whole order. Minimum order quantities vary by plant, with some direct pressers starting around 100 to 300 units and others setting the floor at 500, and nearly all apply an overs-and-unders tolerance of about plus or minus ten percent, so an order of 500 might arrive as 460 or 540. Build the schedule around a realistic timeline. A full pressing and packaging cycle commonly runs about eight to ten weeks, and at busier mid-size plants it can stretch to eight to sixteen weeks, with the largest European facilities longer still. Artwork production runs concurrently with the audio steps, so getting print-ready files approved early keeps the packaging from becoming the bottleneck.
When you hand a plant the job, the clean spec sheet is: total runtime and side split, disc size and speed, vinyl weight and color, jacket and insert format with print files, run quantity, and a note that you want to approve a test pressing before the run. The figures throughout this guide are indicative and shift with the plant and the market, so use them to plan and to ask better questions, and let the quote and the test pressing confirm the specifics for your project.